

In any development environment there is a need for a continuous integration service. Regardless of your opinion of the tool, Jenkins remains one of the most popular choices. Jenkins is an open-source automation server, that is generally used for testing and building applications. During my tenure as a DevOps Engineer one of my main frustrations with Jenkins has been the difficulty in automatically scaling Jenkins Agents based on the workload of jobs. In the Jenkins architecture, the Jenkins Agents are responsible for executing jobs created on and queued by the master. There are a few reasons that automatically scaling Jenkins Agents is so important to me and my team:
- When jobs are queued developers are blocked.
- Scaling by hand requires time, effort, and ultimately detracts from the ability to get productive work done.
- Frequently, Jenkins Agents are idle. These idle instances add to the cost of the system.
Fortunately there are a few Jenkins plugins that allow you to automatically scale Jenkins agents based on demand. For the purpose of this article I am going to be focusing on the Jenkins EC2 Plugin. There are other scaling solutions such as running Jenkins in Kubernetes or the Jenkins EC2 Fleet Plugin but for a simple and effective solution I find that the original EC2 plugin is best. There have been a few studies, namely this one, where companies have claimed to save up to 90% of their Jenkins cost by implementing a solution like the one I will walk you through below. For this walkthrough I will be assuming you already have Jenkins running in AWS and that you only require Unix based agents.
Installing the Jenkins EC 2 plugin
The first thing to do is navigate to your Jenkins instance and install the EC2 plugin. On the Manage plugins screen select "Available", filter by "Amazon EC2", select the checkbox for "Amazon EC2", then click the "Download now and install after restart" button. On the next page you should have the option to restart Jenkins. Restart Jenkins after the installation is complete.
Awesome! We have the plugin installed. Now we have to do some work in AWS so that Jenkins can control the Agents.
AWS configuration
Creating an IAM user for the Amazon EC2 plugin
To begin, log into the AWS console and navigate to the IAM console. First we are going to create a policy that allows Jenkins to control EC2 instances. While the EC2 full access managed policy allows the EC2 plugin to function I prefer to give the minimal access I can. The access policy that I use for the plugin is:
| 1 2 3 4 5 6 7 8 9 10 11 12 13 14 15 16 17 18 19 20 21 22 23 24 25 26 27 28 29 30 31 |
{ "Version": "2012-10-17", "Statement": [ { "Sid": "VisualEditor0", "Effect": "Allow", "Action": [ "ec2:DescribeInstances", "ec2:TerminateInstances", "ec2:RequestSpotInstances", "ec2:DeleteTags", "ec2:CreateTags", "ec2:DescribeRegions", "ec2:RunInstances", "ec2:DescribeSpotInstanceRequests", "ec2:StopInstances", "ec2:DescribeSecurityGroups", "ec2:GetConsoleOutput", "ec2:DescribeSpotPriceHistory", "ec2:DescribeImages", "ec2:CancelSpotInstanceRequests", "iam:PassRole", "ec2:StartInstances", "ec2:DescribeAvailabilityZones", "ec2:DescribeSubnets", "ec2:DescribeKeyPairs" ], "Resource": "*" } ] } |
Next create an IAM user with programmatic access and attach this policy to it. Save the credentials as we will need them for later.
Note: You also have the option of using IAM Roles here instead of a user.
Security groups
In general I prefer to have my Jenkins agents on private subnets, with no public ip addresses, and with a security group that only allows communication from the internal network. The inbound rules I use look something like:
- The security group of my Jenkins Master
- The CIDR block of the internal network
Regardless of how you configure the security group you are going to need to get a security group to attach to the Jenkins agents. Either select or create a security group and save its name for later.
Baking an AMI
For the EC2 Plugin to work you'll need an AMI for your Jenkins agent. The simplest thing to do here is create an AMI from an existing Jenkins agent but I highly recommend using a configuration management tool (we use Ansible) to specify the requirements of the agent as code. The minimum requirements for a Jenkins agent are:
- JDK 8
- A Jenkins user
- The home directory must be set for this user
- This user have an authorized ssh key that you can use from the Jenkins master
- git
For setting up the EC2 plugin the home directory and ssh key will be critical so make note of what they are before proceeding.
Configuring the EC2 Plugin
Before we begin let me list out the information you are going to need:
- The AMI ID for your Jenkins Agent AMI
- The name of the security group you wish to assign to the launched Jenkins Agents
- The credentials for the Jenkins IAM user you created earlier that will launch the agents
- The SSH key that will be used to connect to the Jenkins Agents
- The subnet id of the subnet you want to launch the Jenkins Agents in
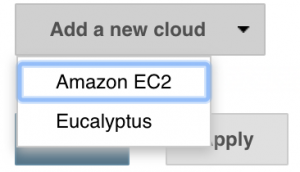
Navigate to your Jenkins instance and get into the Configure System Screen. After installing the Amazon EC2 Plugin there will be a section named Cloud. Select "Add a new cloud" and then select "Amazon EC2":
After select "Amazon EC2" you will be presented with a new screen that looks like this:
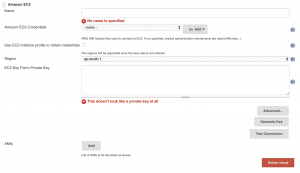
Begin by giving a name to this cloud under the "Name" field. Under "Amazon EC2 Credentials" select "Add" and then "Jenkins"
![]()
Next we have to fill in the fields for the credentials. The "Kind" will be "AWS Credentials" and then you must fill out the "Access Key ID" and "Secret Access Key" fields:
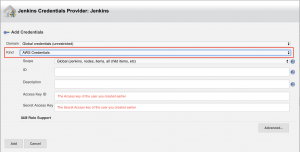
After filling out the fields select "Add".
Under "Region" select the region you are running Jenkins in and then paste the private key for the Jenkins agent under the "EC2 Key Pair's Private Key" section. Next, under the "AMI" section select "Add". This will bring up a long list of fields:
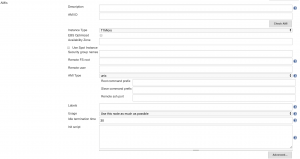
Under "Description" enter a description of what kind of Jenkins Agent AMI this is (in the future you may have more). Under "AMI ID" place the ID of the AMI of your Jenkins Agent. For "Instance Type" select the desired instance type. My preference is for the M5 series of instances. For the "Remote FS root" enter the full path to the home directory of the Jenkins user on the agent AMI and enter "jenkins" as the "Remote User". Under "AMI Type" the only thing you need to fill our is your "Remote ssh port" which is typically 22. Enter the labels that you want this agent to respond to under the "Labels" section. Keep in mind that Jenkins uses these labels to determine when to launch more new agents. Now select the "Advanced" button and another window will pop up:
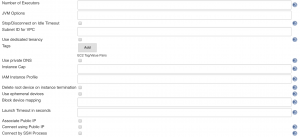
For "Number of Executors" I recommend entering a value equalling the number of cores on the instance type you chose earlier. Under "Subnet ID for VPC" enter the subnet id that you want to launch the agents in. For "Instance Cap" select the maximum number of this AMI you would like to have running at once. Finally at the bottom of the configuration page of Jenkins hit "Save"
Testing your new configuration
Now that we have everything configured, its time to test! To begin we need to disable your existing Jenkins Agents. To do this select "Manage Nodes" under the "Manage Jenkins" screen and one by one select each agent instance and mark it as temporarily offline:

The benefit of this is we can bring the nodes back online if we need them. With all of your agent instances offline run a job that has a label matching the labels you entered earlier for the Cloud configuration and wait. If everything is working after a minute you should see Jenkins launching a new agent to meet demand!
Saving even more
There are a few optimizations you can make to save the most money with this configuration:
- Use smaller instances with less executors and reduce the idle time termination.
- Smaller instances are cheaper and by reducing the idle time termination you can effectively only run agents when you need them.
- Change to spot instances.
- Under the Cloud configuration you can list a maximum spot price. Set this to the on demand price of your chosen instance type and enjoy the savings!
- Use labels wisely.
- Some jobs may need bigger instances to run. Use labels and multiple AMI configurations to only use big instances when they are absolutely necessary.