![iseatz-logo-white.png]](https://www.iseatz.com/hs-fs/hubfs/IZ%20Logos/iseatz-logo-white.png?height=40&name=iseatz-logo-white.png)
Step 1: Run Your Query
Before exporting data, ensure your query retrieves the information you need. If you're new to writing SQL queries, refer to our guide: Querying Snowflake with SQL.
- Write or paste your query in the Snowflake worksheet.
- Click the Run button (or press
Ctrl + Enter/Cmd + Enter). - Wait for the results to populate in the Results pane below the query editor.
Step 2: Review Your Results
Once your query has run, take a moment to verify the results. This step ensures you're exporting the correct data.
- Check that the rows and columns returned meet your expectations.
- Use Snowflake’s built-in features to filter, sort, or refine the data directly in the results pane. Learn more in our guide: Reviewing Query Results in Snowflake.
If the results look good, you’re ready to move to the export step.
Step 3: Export Data from the Results Pane
Snowflake makes it easy to export query results in a format that works for your needs.
Export Options
-
CSV Export (Most Common):
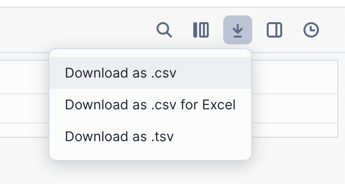
- Click the Download icon (downward arrow) above the results table.
- Select Download Results as CSV.
- Snowflake will generate a CSV file with your query results and prompt you to save it to your device.
- Copy to Clipboard (Small Datasets):
- Highlight rows directly in the results pane.
- Right-click and choose Copy.
- Paste the copied data into a tool like Excel or Google Sheets.
Step 4: Open and Review Your Exported File
Once you’ve saved your exported file, follow these steps to access and validate the data:
-
Locate the File:
- Find the downloaded CSV file in your computer’s Downloads folder or the location you selected during export.
-
Open the File:
- Double-click the file to open it in your default spreadsheet application (e.g., Excel, Google Sheets, or Numbers).
- Alternatively, use a text editor for a raw view of the CSV format.
-
Verify the Data:
- Check that all rows and columns match the results you reviewed in Snowflake.
- Ensure no data is truncated, especially for long text fields or large numeric values.
Troubleshooting Common Export Issues
-
Too Many Rows or Columns:
- If your query returns a very large dataset, the export might take longer or exceed Snowflake’s limits for downloading results. Refine your query with a
WHEREclause to reduce the size of the export. - Example:
SELECT * FROM sample_table WHERE date_column >= '2025-06-01';
- If your query returns a very large dataset, the export might take longer or exceed Snowflake’s limits for downloading results. Refine your query with a
-
Data Formatting Issues:
- If you notice issues like missing headers or improperly formatted fields, open the CSV file in a text editor to inspect the raw data. Confirm column delimiters (commas) are correctly applied.
-
Special Characters or Encoding Errors:
- When exporting data with special characters (e.g., accents, symbols), ensure your spreadsheet application supports UTF-8 encoding. Most modern tools like Excel or Google Sheets handle this automatically.
- When exporting data with special characters (e.g., accents, symbols), ensure your spreadsheet application supports UTF-8 encoding. Most modern tools like Excel or Google Sheets handle this automatically.
Additional Tips
-
Need Multiple Exports?:
- If you need multiple datasets, consider running separate queries and exporting each result set individually.
-
Automating Exports:
- For frequent exports, discuss with your team about automating the process using Snowflake’s built-in connectors or integration with tools like Python, Excel, or Power BI.
Need More Help?
If you encounter issues or need further assistance, feel free to consult with your team or iSeatz support. For more advanced export options or automation, reach out to your Snowflake administrator.
Happy exporting!