![iseatz-logo-white.png]](https://www.iseatz.com/hs-fs/hubfs/IZ%20Logos/iseatz-logo-white.png?height=40&name=iseatz-logo-white.png)
Snowflake has detailed documentation on how to integrate database systems in Snowflake: Snowflake Connectors.
Step 1: Install and Open DBeaver Community Edition
-
Download and install DBeaver Community Edition from DBeaver’s official site.
-
Launch DBeaver on your machine.
Step 2: Create a New Connection
-
In the DBeaver main window, click the New Database Connection button (a plug icon) or navigate to Database » New Database Connection.
-
In the Connect to Database wizard, search for and select Snowflake, then click Next.
Step 3: Enter Connection Details
-
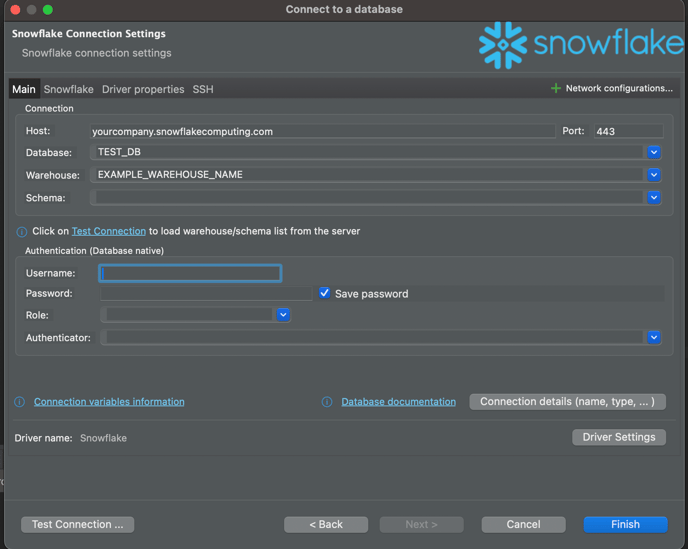
Fill in the required fields for your Snowflake account:
-
Host: Enter your Snowflake account URL, typically formatted as
account-name.snowflakecomputing.com. Example:yourcompany.snowflakecomputing.com -
Database: Specify the default database to connect to (this can be changed later).
-
Warehouse: Enter the name of the Snowflake warehouse you want to use.
-
Schema: Optional—leave blank to access all schemas in the selected database.
-
-
Under Authentication, select Username and Password or External Browser (SSO):
-
For SSO:
-
Select External Browser.
-
When prompted after clicking Test Connection, complete the SSO login in your web browser. (Follow the steps in Login to a Snowflake Reader Account).
-
-
For Username and Password:
-
Enter your Snowflake username (usually your email) and password.
-
-
-
(Optional) Click Driver Properties to modify advanced settings, if required.
-
Click Test Connection to verify the configuration.
-
If successful, click Finish to save the connection.
Step 4: Access Your Snowflake Data
-
In the DBeaver Database Navigator panel, expand your new Snowflake connection to browse databases, schemas, and tables.
-
Double-click a table to preview its data or start writing SQL queries in the SQL Editor by right-clicking the connection and selecting SQL Editor.
Step 5: Querying Data
-
Open a new SQL Editor tab by right-clicking your connection in the Database Navigator and selecting SQL Editor » New SQL Script.
-
Write your SQL query. For example:
SELECT * FROM your_database.your_schema.your_table LIMIT 10;-
Click the Execute SQL Statement button (an orange play icon) or press
Ctrl+Enter/Cmd+Enterto run the query. -
View the results in the Results Pane below the editor.
Step 6: Export Query Results
-
After executing your query, right-click anywhere in the Results Pane and select Export Data.
-
Choose your desired file format (e.g., CSV, Excel).
-
Follow the prompts to specify the file location and export settings, then click Finish.
Tips & Troubleshooting
-
SSO Login Issues: Ensure your Snowflake account is configured for Single Sign-On and that you’re using the correct host URL.
-
Performance: If queries are slow, check the configured warehouse and consider increasing its size.
-
Connection Errors: Double-check your connection details, especially the host URL and authentication method.
-
Query Optimization: Use
LIMITclauses and narrow down results withWHEREconditions to improve performance for large datasets.
For additional information, refer to Snowflake Connectors Documentation.