![iseatz-logo-white.png]](https://www.iseatz.com/hs-fs/hubfs/IZ%20Logos/iseatz-logo-white.png?height=40&name=iseatz-logo-white.png)
Understanding Self-Serve Data in Snowflake
Note: To protect your company's privacy, the generic, example names used in this document won't match what you see in Snowflake, but the principles outlined here are analogous, and can be replaced by your company's specific details.
Common Data Structure
Here’s an example of what self-serve data might look like in Snowflake:
- Database:
selfserve_db - Schema:
public - Views: Commonly named after the data they store, such as:
transactions: Contains details of purchases or orders.users: Contains user profile information.products: Contains product catalog details.
The opposite of a self-serve data source is a curated data source, which tend to have very specific names that specify the data scope and timeframe, such as lob_consumptions_prior_month.
Common Fields for Filtering
When querying self-serve data, you’ll often use specific fields in the WHERE clause to narrow down results. Common fields include:
- Date ranges: e.g.,
transaction_date,created_at - Identifiers: e.g.,
user_id,transaction_id,product_id - Categories: e.g.,
product_category,region
Step 1: Open a Worksheet
- Log in to your Snowflake Reader Account.
- Navigate to the Worksheets tab.
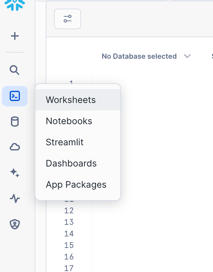
- Open a new worksheet or an existing one for your queries.
Step 2: Explore the Data Structure
- Use the Data Explorer on the left-hand side to find the database and schema.
- Drill down into the tables to view their structure:
- Click on a table name to see its columns, data types, and any descriptions (if available).
- For example, the
transactionstable might include:transaction_id(unique identifier)transaction_date(date of the transaction)total_amount(total value of the transaction)
Step 3: Write a Custom SQL Query
Start with a basic query to retrieve all data from a table:
SELECT *
FROM selfserve_db.public.transactions;
Add Filters to Narrow Results
To refine your data, add a WHERE clause:
-
Filter by date range:
SELECT *
FROM selfserve_db.public.transactions
WHERE transaction_date BETWEEN '2023-01-01' AND '2023-12-31'; -
Filter by specific user or product:
SELECT *
FROM selfserve_db.public.transactions
WHERE user_id = '12345'; -
Combine filters with
ANDorOR:SELECT *
FROM selfserve_db.public.transactions
WHERE transaction_date > '2023-01-01'
AND total_amount > 100;
Select Specific Columns
To make your query more efficient and readable, request only the columns you need:
SELECT transaction_id, transaction_date, total_amount
FROM selfserve_db.public.transactions
WHERE total_amount > 100;
Step 4: Run the Query
- Click the Run button or press
Ctrl + Enter/Cmd + Enter. - Review the query results in the Results pane to ensure they meet your expectations.
Step 5: Review and Export
- Review the Results: Check that the data matches your filters. Use built-in features like sorting or filtering for further exploration (see Reviewing Query Results in Snowflake).
- Export the Data: Save your results as a CSV for use in other tools. Learn how in Exporting Data from Snowflake.
Tips for Using Self-Serve Data
- Start Simple: If you’re new to SQL, begin with small, simple queries before adding complex filters or joining tables.
- Explore the Schema: Use Snowflake’s Data Explorer to familiarize yourself with the table structure and column descriptions.
- Work with Your Team: If you’re unsure which fields to use or how to filter, consult with a colleague or your team for guidance.
- Test Filters: Always test your filters to ensure they return accurate and meaningful results.
Need Help?
If you need assistance with writing SQL queries or understanding the data structure, reach out to your team or iSeatz support. They can help you navigate self-serve data and optimize your queries for better results.
Happy querying!